Endpoint policies on a Publisher allow you to automatically apply an Action Option to a campaign based on the content of that action.
For instance you might have a Windows based landing page or a MacOS based landing page, and want devices to automatically redirect to the correct landing page. You can do this with Endpoint policies.
Similarly you might want to a quick way of creating links to pass through to the Purchase page of your website by quickly editing the campaign link, again you can do this easily with Endpoint policies.
To create Endpoint policies, on a Publisher click on the Policies tab and click on the Endpoints option in the navigation menu:

Click the option to add an Endpoint policy and you will have some configuration options to set. You can filter this Endpoint to only apply to certain campaigns, or to any campaign, and can define the Action that this Endpoint should apply to. This is key as the Action selected will define the options available to apply with this Endpoint, depending on the Options created against the action.
Once you have defined the Action for this Endpoint you can enter any further configuration that the action must meet in order for the Endpoint to be triggered.
In our first example above we want to define the landing page of this action based on the Operating System of the visitor. As such we would leave the Sid fields blank to represent any SIDs on the action, leave the Country set to All Countries and leave the Platform to All platforms:

The key configuration option for this Endpoint would be the Operating System field. Here we can enter Windows to define the windows page:

Next enter the Option of landingpage (defined earlier in Action Options) which allows us to append to the URL Path, and enter the path to the Windows Landing Page in the value field:
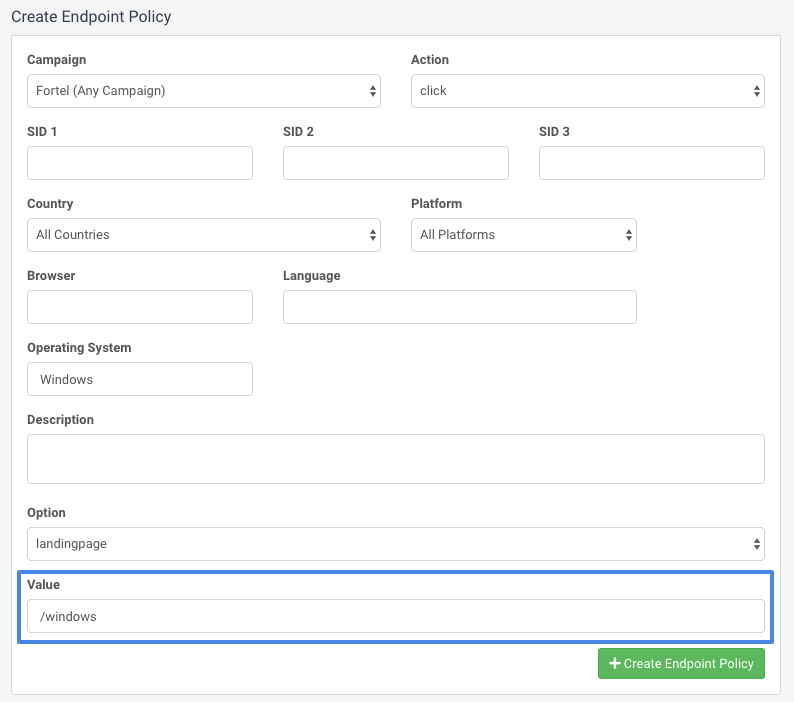
This Endpoint Policy will now only trigger on the Click Action where the Operating System is set to Windows, and will have the effect of redirecting the landing page to the domain url with /windows appended on it, e.g. fortel.li/windows (the windows landing page)
You would then create a similar Endpoint Policy to redirect MacOS visitors to the Mac landing page.
Another example of how to use Endpoint Polciies is to allow a quick and easy way to create tracking links which always redirect to a specific page on your website.
In this example you want to create an Endpoint that means everytime a specific phrase is entered into a SID field on a campaign link, this will be redirected to a specific page, in this case the Purchase Page, but this might equally be a product page, where you want a quick way for campaign links to be sent to a specific product page on your website.
To do this you can make use of the SID fields. By entering a keyword into one of the SID fields, in this case SID2 you can ensure this Endpoint will trigger when the SID2 value matches what is entered here. I have entered Purchase as an example:

You can then use an Action Option which allows you to append the URL path, in this case I will use Purchase-Page and enter in the Purchase page path:

This Endpoint will now trigger for any Click actions on this Publisher where the SID2 value on the action is purchase.
This makes creating multiple campaigns link to the Purchase page rather than the homepage easy as you just need to ensure you add the word 'purchase' to the campaign link in the SID2 field.
You can see how this will look by using the link builder on a campaign:

Rather than having to enter the full path on every campaign link you generate, you can now just put the Keyword into the SID field to have the Endpoint trigger